Arduino/Genuino Zero (BBE)
Downstream Extension!
This board description is a copy from the Zephyr upstream board Arduino/Genuino Zero and will be used for further development, improvement and preparation of changes for Zephyr within Bridle. However, the original board description still lives within the Zephyr namespace.
Overview
The Arduino Zero is a maker-friendly development board with Atmel’s Embedded Debugger (EDBG [10]), which provides a full debug interface without the need for additional hardware.

List of extensions
This is a set of Bridle’s board extensions (BBE) to the original Zephyr upstream board Arduino/Genuino Zero with some adaptions and improvement on Twister, Kconfig and Devicetree level. Notes and details about these extensions can be found at various points within this documentation.
Hardware
ATSAMD21G18A [28] ARM Cortex-M0+ processor at 48 MHz
32.768 kHz crystal oscillator
256 KiB flash memory and 32 KiB of RAM
3 user LEDs (L/Rx/Tx)
One reset button
On-board USB based EDBG unit with serial console
Native USB port
Arduino UNO R3headerArduino ICSP header
Supported Features
The arduino_zero//bbe board configuration supports the following
hardware features:
Peripheral |
Kconfig option |
Devicetree compatible |
Zephyr API |
|---|---|---|---|
PINCTRL |
|||
GPIO |
|||
UART |
|||
UDC (USB Device Controller) |
|||
I2C |
|||
SPI |
|||
PWM |
|||
DAC |
|||
ADC |
|||
RTC |
|||
Timer (Counter) |
|
||
Watchdog Timer (WDT) |
|||
Flash |
|||
DMA |
|||
HWINFO |
|||
CLOCK / PM |
not supported |
atmel,samd2x-gclkatmel,samd2x-pm |
|
NVIC |
N/A |
Nested Vector Interrupts Controller |
|
SYSTICK |
N/A |
Other hardware features are not currently supported by Zephyr.
The extended default configuration can be found in the downstream file boards/arduino/zero/arduino_zero_bbe_default. It is a extended copy of the original board default configuration in boards/arduino/zero/arduino_zero_defconfig.
Board Configurations
The arduino_zero//bbe board can be configured for the following
different use cases.
west build -b arduino_zero//bbe -S usb-console
Use the native USB device port with CDC-ACM as Zephyr console and for the shell, see USB Console Snippet (usb-console).
west build -b arduino_zero//bbe
Use the serial port SERCOM5 over EDBG as Zephyr console and for the shell.
List of extensions
Board YAML
add the missing features that this board supports and that Twister tests might depends on:
arduino_gpioarduino_i2carduino_spiarduino_seriali2c
Devicetree
set default entries for
modelandcompatibleof the boards:Arduino/Genuino Zero
arduino_zero_bbe.dts/ { model = "Arduino Zero @ UART Concole (BBE)"; compatible = "arduino,zero", "arduino,zero-bbe", "arduino,zero-uartcons", "arduino,zero-uartcons-bbe", "atmel,samd21g18a", "atmel,samd21"; };
Connections and IOs
The Arduino store [20] has detailed information about board connections. Download the Arduino Zero Schematic [22] or Arduino Zero Design Data [23] for more detail. There is also an Arduino Zero Pinout Diagram [21].
Devicetree
add the Arduino UNO R3 specific edge connector binding
&arduino_header {...};with additional labels:Arduino/Genuino Zero
arduino_r3_connector.dtsiarduino_header: connector { compatible = "arduino-header-r3"; #gpio-cells = <2>; gpio-map-mask = <0xffffffff 0xffffffc0>; gpio-map-pass-thru = <0 0x3f>; gpio-map = <ARDUINO_HEADER_R3_A0 0 &porta 2 0>, /* DAC:VOUT */ <ARDUINO_HEADER_R3_A1 0 &portb 8 0>, /* ADC:AIN2 */ <ARDUINO_HEADER_R3_A2 0 &portb 9 0>, /* ADC:AIN3 */ <ARDUINO_HEADER_R3_A3 0 &porta 4 0>, /* ADC:AIN4 */ <ARDUINO_HEADER_R3_A4 0 &porta 5 0>, /* ADC:AIN5 */ <ARDUINO_HEADER_R3_A5 0 &portb 2 0>, /* ADC:AIN10 */ /* AREF (ADC/DAC:VRFEA) */ <ARDUINO_HEADER_R3_D0 0 &porta 11 0>, /* SERCOM0:UART:RX */ <ARDUINO_HEADER_R3_D1 0 &porta 10 0>, /* SERCOM0:UART:TX */ <ARDUINO_HEADER_R3_D2 0 &porta 14 0>, <ARDUINO_HEADER_R3_D3 0 &porta 9 0>, <ARDUINO_HEADER_R3_D4 0 &porta 8 0>, <ARDUINO_HEADER_R3_D5 0 &porta 15 0>, <ARDUINO_HEADER_R3_D6 0 &porta 20 0>, <ARDUINO_HEADER_R3_D7 0 &porta 21 0>, <ARDUINO_HEADER_R3_D8 0 &porta 6 0>, <ARDUINO_HEADER_R3_D9 0 &porta 7 0>, <ARDUINO_HEADER_R3_D10 0 &porta 18 0>, /* SERCOM1:SPI:SS */ <ARDUINO_HEADER_R3_D11 0 &porta 16 0>, /* SERCOM1:SPI:COPI */ <ARDUINO_HEADER_R3_D12 0 &porta 19 0>, /* SERCOM1:SPI:CIPO */ <ARDUINO_HEADER_R3_D13 0 &porta 17 0>, /* SERCOM1:SPI:SCK */ <ARDUINO_HEADER_R3_D14 0 &porta 22 0>, /* SERCOM3:I2C:SDA */ <ARDUINO_HEADER_R3_D15 0 &porta 23 0>; /* SERCOM3:I2C:SCL */ };
arduino_r3_connector.dtsiarduino_i2c: &sercom3 {}; arduino_spi: &sercom1 {}; arduino_serial: &sercom0 {};
System Clock
The SAMD21 MCU is configured to use the 32.768 kHz external crystal with the on-chip PLL generating the 48 MHz system clock. The internal APB and GCLK unit are set up in the same way as the upstream Arduino libraries.
GPIO (PWM) Ports
The SAMD21 MCU has 2 GPIO ports, 3 PWM able Timer/Capture-Counter (TCC) and
2 simple Timer/Counter (TC). On the Arduino Zero, TCC2 channel 1 is
available on first user LED (L), all other user LEDs can be controlled
as GPIO. Only if CONFIG_PWM_SAM0_TCC is enabled then the
first user LED (L) is driven by TCC2 instead of by GPIO. All channels of
TCC0 and TCC1 are available on the Arduino UNO R3 header.
ADC/DAC Ports
The SAMD21 MCU has 1 DAC and 1 ADC. On the Arduino Zero the DAC voltage
output (VOUT) is available on A0 of the Arduino UNO R3 header. The ADC
channels 2-5 and 10 are available on A1-A5 of the Arduino UNO R3 header.
The external voltage reference VREFA can be used optional for the DAC and
ADC on same time and is available on AREF of the Arduino UNO R3 header.
SPI Port

The SAMD21 MCU has 6 SERCOM based SPIs. On the Arduino Zero, SERCOM4 is
available on the 6 pin ICSP connector at the edge of the board. To the
Arduino UNO R3 header SERCOM1 is connect to external devices over D11 (MOSI),
D12 (MISO), and D13 (SCK). All signals of both busses are connected in
parallel to the Atmel EDBG.
Devicetree
provide the SPI Port at the Arduino UNO R3 specific edge connector:
Arduino/Genuino Zero
arduino_zero_bbe.dts&sercom1 { status = "okay"; compatible = "atmel,sam0-spi"; dipo = <3>; dopo = <0>; #address-cells = <1>; #size-cells = <0>; // either: cs-gpios = <&arduino_header ARDUINO_HEADER_R3_D10 GPIO_ACTIVE_LOW>; // or: cs-gpios = <&porta 18 GPIO_ACTIVE_LOW>; // or: pinctrl-0 = <&sercom1_spi_hwss>; pinctrl-0 = <&sercom1_spi_default>; pinctrl-names = "default"; };
arduino_r3_connector.dtsiarduino_spi: &sercom1 {};
I2C Port
The SAMD21 MCU has 6 SERCOM based I2Cs. On the Arduino Zero, SERCOM3 is signals are connected in parallel to the Atmel EDBG.
Devicetree
provide the I2C Port at the Arduino UNO R3 specific edge connector:
Arduino/Genuino Zero
arduino_zero_bbe.dts&sercom3 { status = "okay"; compatible = "atmel,sam0-i2c"; clock-frequency = <I2C_BITRATE_FAST>; #address-cells = <1>; #size-cells = <0>; pinctrl-0 = <&sercom3_i2c_default>; pinctrl-names = "default"; };
arduino_r3_connector.dtsiarduino_i2c: &sercom3 {};
Serial Port
The SAMD21 MCU has 6 SERCOM based USARTs. One of the USARTs (SERCOM5) is
connected to the onboard Atmel Embedded Debugger (EDBG) and is the Zephyr
console. This is captured by the standard board configuration. SERCOM0 is
available on the D0 (RX) and D1 (TX) of the Arduino UNO R3 header.
USB Device Port

The SAMD21 MCU has a (native) USB device port that can be used to communicate with a host PC. See Zephyr USB for more, such as the USB CDC ACM UART sample sample which sets up a virtual serial port that echos characters back to the host PC. As an alternative to the default Zephyr console on serial port the Bridle USB Console Snippet (usb-console) can be used to enable CDC ACM and switch the console to USB:
USB device idVendor=2341, idProduct=804d, bcdDevice= 4.05
USB device strings: Mfr=1, Product=2, SerialNumber=3
Product: Arduino Zero (CDC ACM)
Manufacturer: Arduino LLC
SerialNumber: 9CF503EE1D54A301
Kconfig
deactivate self powered USB explicitly and set the maximum of electrical current consumption to 500㎃:
Arduino/Genuino Zero
Kconfig.defconfigconfig CDC_ACM_SERIAL_SELF_POWERED default n depends on USB_DEVICE_STACK_NEXT && USBD_CDC_ACM_CLASS config CDC_ACM_SERIAL_MAX_POWER default 250 if BOARD_ARDUINO_ZERO # 500mA depends on USB_DEVICE_STACK_NEXT && USBD_CDC_ACM_CLASS
change log level only in case of use the native USB device port
atmel,sam0-usbwith CDC-ACM UARTzephyr,cdc-acm-uartas Zephyr console:CONFIG_USBD_CDC_ACM_LOG_LEVEL_CHOICE:=CONFIG_USBD_CDC_ACM_LOG_LEVEL_OFFCONFIG_UDC_DRIVER_LOG_LEVEL_CHOICE:=CONFIG_UDC_DRIVER_LOG_LEVEL_ERR
Arduino/Genuino Zero
Kconfig.defconfig# Workaround for not being able to have commas in macro arguments DT_CHOSEN_Z_CONSOLE := zephyr,console DT_COMPAT_Z_CDC_ACM_UART := zephyr,cdc-acm-uart DT_COMPAT_ATMEL_USB := atmel,sam0-usb # Macros to shorten Kconfig expressions DT_CHOSEN_CONSOLE_NODE := $(dt_chosen_path,$(DT_CHOSEN_Z_CONSOLE)) DT_CHOSEN_CONSOLE_PARENT := $(dt_node_parent,$(DT_CHOSEN_CONSOLE_NODE)) if BOARD_ARDUINO_ZERO && \ $(dt_chosen_enabled,$(DT_CHOSEN_Z_CONSOLE)) && \ $(dt_compat_on_bus,$(DT_COMPAT_Z_CDC_ACM_UART),usb) && \ $(dt_node_has_compat,$(DT_CHOSEN_CONSOLE_PARENT),$(DT_COMPAT_ATMEL_USB)) # Logger cannot use itself to log choice USBD_CDC_ACM_LOG_LEVEL_CHOICE default USBD_CDC_ACM_LOG_LEVEL_OFF depends on LOG && USB_DEVICE_STACK_NEXT && USBD_CDC_ACM_CLASS endchoice # Set USB log level to error only choice USBD_LOG_LEVEL_CHOICE default USBD_LOG_LEVEL_ERR depends on LOG && USB_DEVICE_STACK_NEXT && USBD_CDC_ACM_CLASS endchoice # Set UDC driver log level to error only choice UDC_DRIVER_LOG_LEVEL_CHOICE default UDC_DRIVER_LOG_LEVEL_ERR depends on LOG && USB_DEVICE_STACK_NEXT && USBD_CDC_ACM_CLASS endchoice endif # zephyr,cdc-acm-uart
Programming and Debugging
The Arduino Zero ships the BOSSA compatible UF2 bootloader [13] also known as Arduino Zero Bootloader [24], a modern SAM-BA [12] (Boot Assistant) replacement. The bootloader can be entered by pressing the RST button twice:
USB device idVendor=2341, idProduct=004d, bcdDevice= 2.00
USB device strings: Mfr=1, Product=2, SerialNumber=0
Product: Arduino Zero
Manufacturer: Arduino LLC
Additionally, if CONFIG_USB_CDC_ACM is enabled then the
bootloader will be entered automatically when you run west flash.
Kconfig
BOSSA bootloader device:
Arduino/Genuino Zero
Kconfig.defconfigconfig BOOTLOADER_BOSSA_DEVICE_NAME default "$(dt_chosen_label,$(DT_CHOSEN_Z_CONSOLE))" depends on USB_CDC_ACM
Tip
When ever you need to restore this original bootloader you should read and following the directions in Arduino Zero Advanced Features [25] and Update the Bootloader on the Arduino Zero [26]. There is also a backup copy of the original bootloader together with a ready to use Segger JFlash control file inside the Bridel project:
The Segger JFlash control file is only useful when the EDBG firmware was upgrade to the latest J-Link firmware for Atmel EDBG [6]. This was a special OEM firmware version for Atmel’s Xplained Platforms, based on the AT32UC3A4256S [29] 32-bit AVR microcontroller.
Danger
It is neither guaranteed nor tested that the J-Link firmware for Atmel EDBG will also work on the EDGB populated on the Arduino Zero! See also the warning to Atmel Studio 7 below. In doubt you should never touch the EDBG firmware on Arduino Zero.
So if that didn’t happen, OpenOCD or, even easier, the small tool edbg, the CMSIS-DAP programmer [14] by a Microchip employee, should be used:
$ srec_cat samd21_sam_ba.hex -Intel -Output samd21_sam_ba.bin -Binary
$ edbg --list    # convert HEX to BIN file and get <your_edbg_sn>

$ edbg --verbose --serial <your_edbg_sn> --target samd21 \
       --erase --program --verify --file samd21_sam_ba.bin
It is also possible to use Microchip’s own Python MCU programmer [15] together with the Python Kit information [16] utility and write the Intel HEX file directly back to flash without conversion to BIN file:
$ pykitinfo # get <your_edbg_sn>
$ pymcuprog --verbose info --tool edbg --serialnumber <your_edbg_sn> \
            --device atsamd21g18a --file samd21_sam_ba.hex \
            --erase --verify write
Atmel Embedded Debugger (EDBG)
The Arduino Zero also comes with an Atmel Embedded Debugger (EDBG [10]). That provides a debug interface to the SAMD21 chip and is supported by OpenOCD for bootloader restore or direct programming and debugging. The Atmel EDGB is connected to the debug USB port for programming:
USB device idVendor=03eb, idProduct=2157, bcdDevice= 1.01
USB device strings: Mfr=1, Product=2, SerialNumber=3
Product: EDBG CMSIS-DAP
Manufacturer: Atmel Corp.
SerialNumber: E8VRDGVEYNKJTF8LS45K
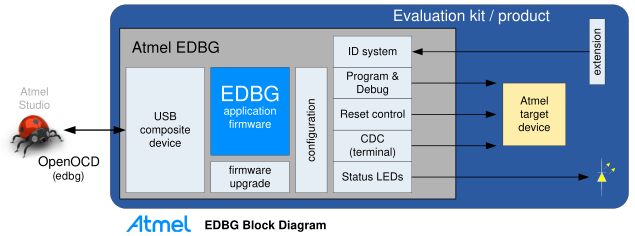
Arduino Zero, Atmel EDBG, and Atmel Studio 7
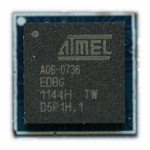
The Arduino Zero was designed in partnership with Atmel (now Microchip) which dedicated to this board a special USB PID with the major purpose to make the board recognizable and differentiate it form other evaluation boards in Atmel Studio. The EDBG chip is used on several Atmel evaluation boards and programmers, you can find the list here [9]. You should consider the Arduino Zero dedicated USB PID (
0x2157) as another USB PID to add to that list. During the manufacturing process Arduino upgrade the EDBG firmware and customize the USB descriptor fields.—https://github.com/arduino/ArduinoCore-samd/issues/286#issuecomment-354807646
Upgrading the firmware with a new one provided by Atmel Studio 7 using
the atfw.exe tool will erase all the factory “Arduino Zero”
USB configurations and will set the USB PID to 0x2111. But
consider that you couldn’t revert the Arduino USB descriptor settings!
Flashing
Build the Zephyr kernel and the Hello World sample application:
west build -b arduino_zero//bbe -p -d build/arduino_zero zephyr/samples/hello_world
Connect the Arduino Zero to your host computer using the native USB port (before the USB debug port) to rech the bootloader.
Connect the Arduino Zero to your host computer using the USB debug port (after the native USB port) to reach the virtual console of EDBG.
Run your favorite terminal program to listen for output. Under Linux the terminal should be
/dev/ttyACM0. For example:minicom -D /dev/ttyACM0 -oThe
-ooption tells minicom not to send the modem initialization string. Connection should be configured as follows:Speed: 115200
Data: 8 bits
Parity: None
Stop bits: 1
Pressing the RST button twice quickly to enter bootloader mode.
Flash the image:
west flash -d build/arduino_zero
You should see “Hello World! arduino_zero/samd21g18a/bbe” in your terminal.
Debugging
Debugging is only possible over SWD with the help of EDBG!
Do the for the debug session necessary steps as before except enter the bootloader mode and the flashing.
Flash the image and attach a debugger to your board:
west build -b arduino_zero//bbe -p -d build/arduino_zero zephyr/samples/hello_world -- -DBOARD_FLASH_RUNNER=openocd
west debug -d build/arduino_zero
You should ends up in a debug console (e.g. a GDB session).
More Samples
LED Blinky
west build -b arduino_zero//bbe -p -d build/arduino_zero zephyr/samples/basic/blinky
west flash -d build/arduino_zero
LED Fade
west build -b arduino_zero//bbe -p -d build/arduino_zero zephyr/samples/basic/fade_led
west flash -d build/arduino_zero
Basic Threads
west build -b arduino_zero//bbe -p -d build/arduino_zero zephyr/samples/basic/threads
west flash -d build/arduino_zero
Hello Shell with USB-CDC/ACM Console
west build -b arduino_zero//bbe -p -S "usb-console" -d build/arduino_zero bridle/samples/helloshell
west flash -d build/arduino_zero
Simple test execution on target
(text in bold is a command input)
uart:~$ hello -h
hello - say hello
uart:~$ hello
Hello from shell.
uart:~$ hwinfo devid
Length: 16
ID: 0xde73d01ae52511ed9cf503ee1d54a301

uart:~$ kernel version
Zephyr version 4.5.0

uart:~$ bridle version
Bridle version 4.4.99

uart:~$ bridle version long
Bridle version 4.4.99.0

uart:~$ bridle info
Zephyr: 4.5.0
Bridle: 4.4.99
uart:~$ device list
devices:
- eic@40001800 (READY)
  DT node labels: eic
- gpio@41004480 (READY)
  DT node labels: portb
- gpio@41004400 (READY)
  DT node labels: porta
- snippet_cdc_acm_console_uart (READY)
  DT node labels: snippet_cdc_acm_console_uart
- sercom@42001c00 (READY)
  DT node labels: sercom5
- sercom@42000800 (READY)
  DT node labels: sercom0 arduino_serial
- usb@41005000 (READY)
  DT node labels: usb0 zephyr_udc0
- adc@42004000 (READY)
  DT node labels: adc
- dac@42004800 (READY)
  DT node labels: dac0
- nvmctrl@41004000 (READY)
  DT node labels: nvmctrl
- sercom@42001400 (READY)
  DT node labels: sercom3 arduino_i2c
- tcc@42002800 (READY)
  DT node labels: tcc2
- leds (READY)
uart:~$ history
[  0] history
[  1] device list
[  2] bridle info
[  3] bridle version long
[  4] bridle version
[  5] kernel version
[  6] hwinfo devid
[  7] hello
[  8] hello -h
Operate with the yellow Rx user LED:
uart:~$ gpio get portb 3
0

uart:~$ gpio conf portb 3 ol0

uart:~$ gpio set portb 3 1
uart:~$ gpio set portb 3 0

uart:~$ gpio blink portb 3
Hit any key to exit
Operate with the builtin user LED:
uart:~$ pwm usec tcc2 1 20000 20000
uart:~$ pwm usec tcc2 1 20000 19000
uart:~$ pwm usec tcc2 1 20000 18000
uart:~$ pwm usec tcc2 1 20000 17000
uart:~$ pwm usec tcc2 1 20000 16000
uart:~$ pwm usec tcc2 1 20000 15000
uart:~$ pwm usec tcc2 1 20000 10000
uart:~$ pwm usec tcc2 1 20000 5000
uart:~$ pwm usec tcc2 1 20000 2500
uart:~$ pwm usec tcc2 1 20000 500
uart:~$ pwm usec tcc2 1 20000 0
Operate with the loop-back wire from A0 (DAC CH0 VOUT) to A1 (ADC CH2 AIN):
uart:~$ dac setup dac0 0 10
uart:~$ adc adc@42004000 resolution 12
uart:~$ adc adc@42004000 acq_time 10 us
uart:~$ adc adc@42004000 channel positive 2
uart:~$ dac write_value dac0 0 512
uart:~$ adc adc@42004000 read 2
read: 2016
uart:~$ dac write_value dac0 0 1023
uart:~$ adc adc@42004000 read 2
read: 4047
Erase, Write and Verify
uart:~$ flash read nvmctrl 0x3c000 0x40
0003C000: ff ff ff ff ff ff ff ff  ff ff ff ff ff ff ff ff |........ ........|
0003C010: ff ff ff ff ff ff ff ff  ff ff ff ff ff ff ff ff |........ ........|
0003C020: ff ff ff ff ff ff ff ff  ff ff ff ff ff ff ff ff |........ ........|
0003C030: ff ff ff ff ff ff ff ff  ff ff ff ff ff ff ff ff |........ ........|

uart:~$ flash test nvmctrl 0x3c000 0x400 2
Erase OK.
Write OK.
Verified OK.
Erase OK.
Write OK.
Verified OK.
Erase-Write-Verify test done.
uart:~$ flash read nvmctrl 0x3c000 0x40
0003C000: 00 01 02 03 04 05 06 07  08 09 0a 0b 0c 0d 0e 0f |........ ........|
0003C010: 10 11 12 13 14 15 16 17  18 19 1a 1b 1c 1d 1e 1f |........ ........|
0003C020: 20 21 22 23 24 25 26 27  28 29 2a 2b 2c 2d 2e 2f | !"#$%&' ()*+,-./|
0003C030: 30 31 32 33 34 35 36 37  38 39 3a 3b 3c 3d 3e 3f |01234567 89:;<=>?|

uart:~$ flash page_info 0x3c000
Page for address 0x3c000:
start offset: 0x3c000
size: 256
index: 960
uart:~$ flash erase nvmctrl 0x3c000 0x400
Erase success.

uart:~$ flash read nvmctrl 0x3c000 0x40
0003C000: ff ff ff ff ff ff ff ff  ff ff ff ff ff ff ff ff |........ ........|
0003C010: ff ff ff ff ff ff ff ff  ff ff ff ff ff ff ff ff |........ ........|
0003C020: ff ff ff ff ff ff ff ff  ff ff ff ff ff ff ff ff |........ ........|
0003C030: ff ff ff ff ff ff ff ff  ff ff ff ff ff ff ff ff |........ ........|
The Arduino Zero has no on-board I2C devices. For this example the Grove Temperature and Barometer Sensor – BMP280 [27] was connected.
uart:~$ log enable none i2c_sam0

uart:~$ i2c scan arduino_i2c
     0  1  2  3  4  5  6  7  8  9  a  b  c  d  e  f
00:             -- -- -- -- -- -- -- -- -- -- -- --
10: -- -- -- -- -- -- -- -- -- -- -- -- -- -- -- --
20: -- -- -- -- -- -- -- -- 28 -- -- -- -- -- -- --
30: -- -- -- -- -- -- -- -- -- -- -- -- -- -- -- --
40: -- -- -- -- -- -- -- -- -- -- -- -- -- -- -- --
50: -- -- -- -- -- -- -- -- -- -- -- -- -- -- -- --
60: -- -- -- -- -- -- -- -- -- -- -- -- -- -- -- --
70: -- -- -- -- -- -- -- 77
2 devices found on arduino_i2c

uart:~$ log enable inf i2c_sam0
The I2C address 0x77 is a Bosch BMP280 Air Pressure Sensor and their
Chip-ID can read from register 0xd0. The Chip-ID must be 0x58:
uart:~$ i2c read_byte arduino_i2c 77 d0
Output: 0x58
Hint
The I2C address 0x28 is the Data Gateway Interface (DGI [8])
to the builtin Atmel EDBG [10]. See the old ASF3 [7] example code on
GitHub, SAM EDBG TWI Information Interface Example [11], to learn
how to work with this I2C device:
The DGI consists of several physical data interfaces to communicate with the host computer; I2C is only one of them. Communication over the interfaces is bidirectional. It can be used to send events and values from the ATSAMD21G18A, or as a generic printf-style data channel. Traffic over the interfaces can be timestamped on the EDBG for a more accurate tracing of events. Note that timestamping imposes an overhead that reduces maximal throughput. The DGI uses a proprietary protocol, and is thus only compatible with Atmel Studio.