Waveshare RP2040-Geek
The RP2040 SoC [36] by Raspberry Pi Ltd. is a small sized and low-cost 32-bit dual ARM Cortex-M0+ microcontroller and predestined for versatile board designs. The Waveshare RP2040 board series based on this microcontroller offers a wide range with different scaling factors, in size, features and interfaces for communication, input and output.
Board Overview
Hardware
The RP2040 Geek is an RP2040 development board for geeks, housed in a special case and ready to build your own Picoprobe [14] USB-to-SWD and UART bridge. The on-board USB-A connector makes it usable on any host computer. The two dedicated on-board 3-pin SWD port and 3-pin UART port are compatible to the original Raspberry Pi Debug Probe [15]. For more details read the Raspberry Pi 3-pin Debug Connector Specification [16]. An additional 4-pin IO port with I2C or ADC pins can be used for testing target boards.
Features and Resources |
Printed Circuit Board |
5V/200㎃ 3.3V/300㎃ 3.3V(OUT) 133㎒ 4㎆ 264㎅ LCD TF/microSD USB-A UF2 6 6 2 2 2
Design Data |
|
Positions
|
|---|
|
Data Sheets
Flash partitions
QSPI NOR-Flash |
bootrom |
code_partition |
storage_partition |
|---|---|---|---|
primary 4㎆ |
256B |
1㎆ - 256B |
3㎆ |
Pinouts
The peripherals of the RP2040 SoC [36] can be routed to various pins on the board. The configuration of these routes can be modified through DTS. Please refer to the datasheet to see the possible routings for each peripheral. The default assignments for the board is defined below.
External pin mapping on the RP2040-Geek is compatible to the original Raspberry Pi Debug Probe [15], but not identical. One additional edge connector provides two special IO pins for target board testing (I2C in default or ADC). There is no SPI bus on any edge connector. These are used internally to connect the on-board LCD and TF card slots.
Pin Mapping |
Pinout |
Default Zephyr Peripheral Mapping
Devicetree compatible |

Example as Picoprobe USB-to-SWD and UART bridge. |
Supported Features
Similar to the Raspberry Pi Pico the board configuration supports the following hardware features:
Peripheral |
Kconfig option |
Devicetree compatible |
Zephyr API |
|---|---|---|---|
PINCTRL |
|||
GPIO |
|||
UART |
|||
UDC (USB Device Controller) |
|||
I2C |
|||
SPI |
|||
PWM |
|||
ADC |
|||
Temperature (Sensor) |
|||
RTC |
|||
Timer (Counter) |
|||
Watchdog Timer (WDT) |
|||
Flash |
|||
PIO |
N/A |
||
UART (PIO) |
|||
SPI (PIO) |
|||
DMA |
|||
HWINFO |
N/A |
||
VREG |
|||
RESET |
|||
CLOCK |
|||
NVIC |
N/A |
Nested Vector Interrupts Controller |
|
SYSTICK |
N/A |
Other hardware features are not currently supported by Zephyr. The default configuration can be found in the different Kconfig files:
Board Configurations
The board can be configured for the following different use cases.
west build -b waveshare_rp2040_geek
Use the serial port UART1 on edge header as Zephyr console and for the shell.
west build -b waveshare_rp2040_geek -S usb-console
Use the native USB device port with CDC-ACM as Zephyr console and for the shell.
Connections and IOs
The Waveshare wiki [19] has detailed information about board connections. Download the different schematics or datasheets as linked above per board for more details. The pinout diagrams can also be found there.
System Clock
The RP2040 [36] MCU is configured to use the 12㎒ external crystal with the on-chip PLL generating the 125㎒ system clock. The internal AHB and APB units are set up in the same way as the upstream Raspberry Pi Pico C/C++ SDK [11] libraries.
GPIO (PWM) Ports
The RP2040 [36] MCU has 1 GPIO cell which covers all I/O pads and 8 PWM function unit each with 2 channels beside a dedicated Timer unit. The channel PWM4 B is available on the on-board backlight LED. Only the channels PWM1 A and B are available on one of the three edge connectors. Both PWM channels will share the same lines with the I2C1 signals.
ADC/TS Ports
The RP2040 [36] MCU has 1 ADC with 4 channels and an additional fifth channel for the on-chip temperature sensor (TS). The ADC channels 2-3 are available on one of the three edge connectors. Both ADC channels will share the same lines with the I2C0 signals.
The external voltage reference ADC_VREF is directly connected to the 3.3V power supply.
SPI Port
The RP2040 [36] MCU has 2 SPIs. Neither of the two SPIs is exposed externally. These are connected internally to the LCD and the TF/microSD card interfaces.
I2C Port
The RP2040 [36] MCU has 2 I2Cs. To one of the three edge connectors I2C0 is connect to external devices over GP28 (I2C0_SDA) and GP29 (I2C0_SCL). Teses two I2C0 signals will share the same lines with ADC channels 2 and 3. I2C0 is enabled by default.
Serial Port
The RP2040 [36] MCU has 2 UARTs. One of the UARTs (UART1) is connected to external devices over GP4 (TX) and GP5 (RX) on one of the three edge connectors. UART0 is not enabled by default.
USB Device Port
The RP2040 [36] MCU has a (native) USB device port that can be used to communicate with a host PC. See the USB sample applications for more, such as the USB CDC ACM UART sample sample which sets up a virtual serial port that echos characters back to the host PC. As an alternative to the default Zephyr console on serial port the Bridle USB Console Snippet (usb-console) can be used to enable CDC ACM and switch the console to USB:
USB device idVendor=2e8a, idProduct=000a, bcdDevice= 4.05
USB device strings: Mfr=1, Product=2, SerialNumber=3
Product: RP2040-Geek (CDC ACM)
Manufacturer: Waveshare (Raspberry Pi)
SerialNumber: B69F8448A6E91514
To integrate specific USB device functions that do not follow a USB standard class, the following alternate identifier numbers are available for the various Waveshare RP2040 and RP2350 boards according to the Raspberry Pi USB product ID list [10]:
RP2040
0x101F:0x1020:0x1021:0x1039:RP2040-LCD-1.28
0x103A:0x1044:Power Management HAT (B)
0x1055:0x1056:0x1057:RP2040-Touch-LCD-1.28
0x1083:RP2040-PiZero
0x1084:0x1085:0x1086:RP2040-BLE
0x1087:PICO-Cam-A
RP2350
0x10B0:RP2350-Zero
0x10B1:RP2350-Plus
0x10B2:RP2350-Tiny
0x10B3:RP2350-LCD-1.28
0x10B4:RP2350-Touch-LCD-1.28
0x10B5:RP2350-One
0x10B6:RP2350-Geek
0x10B7:RP2350-LCD-0.96
0x10C3:RP2350-ETH
Programmable I/O (PIO)
The RP2040 SoC [36] comes with two PIO periherals. These are two simple co-processors that are designed for I/O operations. The PIOs run a custom instruction set, generated from a custom assembly language. PIO programs are assembled using pioasm, a tool provided by Raspberry Pi. Further information can be found in the Raspberry Pi Pico C/C++ SDK [11] document, section with title “Using PIOASM, the PIO Assembler”.
Zephyr does not (currently) assemble PIO programs. Rather, they should be manually assembled and embedded in source code. An example of how this is done can be found at drivers/serial/uart_rpi_pico_pio.c or drivers/spi/spi_rpi_pico_pio.c.
Programming and Debugging
Flashing
The board can only be flashed with a UF2 file. There is no SWD connector.
Using UF2
By default, building an application for the board will generate a
build/zephyr/zephyr.uf2 file. If the board is powered on with
the BOOTSEL button pressed, it will appear on the host as a mass
storage device:
USB device idVendor=2e8a, idProduct=0003, bcdDevice= 1.00
USB device strings: Mfr=1, Product=2, SerialNumber=0
Product: RP2 Boot
Manufacturer: Raspberry Pi
SerialNumber: E0C9125B0D9B
The UF2 file should be drag-and-dropped or copied on command line to the device, which will then flash the board.
RP2040 Boot-ROM
Each RP2040 SoC [36] ships the UF2 compatible [6] bootloader pico-bootrom-rp2040 [13], a native support in silicon. The full source for the RP2040 bootrom at pico-bootrom-rp2040 [13] includes versions B0, B1 and B2 of the bootrom, which correspond to the same silicon revisions, respectively.
Note that every time you build a program for the RP2040, the Pico SDK selects
an appropriate second stage bootloader based on what kind of external QSPI
Flash type the board configuration you are building for was giving. There
are several versions of boot2 [12] for different flash chips, and each one is
exactly 256 bytes of code which is put right at the start of the eventual
program binary. On Zephyr the boot2 versions are part of the
Raspberry Pi Pico HAL [18] module. Possible selections:
CONFIG_RP2_FLASH_AT25SF128A:CONFIG_RP2_FLASH_GENERIC_03H:CONFIG_RP2_FLASH_IS25LP080:CONFIG_RP2_FLASH_W25Q080:CONFIG_RP2_FLASH_W25X10CL:
The board set this option to CONFIG_RP2_FLASH_W25Q080.
Further information can be found in the RP2040 Datasheet [37], sections with title “Bootrom” and “Processor Controlled Boot Sequence” or Brian Starkey’s Blog article Pico serial bootloader [17]
Debugging
The board does not provide any SWD connector, thus debugging software is not possible.
Basic Samples
LED Blinky and Fade
Hint
Neither LED Blinky nor LED Fade can be built and executed on the RP2040-Geek for an actual user LED, but of course the LCD backlight can be used for testing purposes.
LCD Backlight LED Blinky by GPIO
See also Zephyr sample: Blinky.
west build -b waveshare_rp2040_geek/rp2040 -p -d build/waveshare_rp2040_geek zephyr/samples/basic/blinky -- -DCONFIG_REGULATOR_GPIO=n
west flash -d build/waveshare_rp2040_geek
LCD Backlight LED Blinky by PWM
See also Zephyr sample: PWM Blinky.
west build -b waveshare_rp2040_geek/rp2040 -p -d build/waveshare_rp2040_geek zephyr/samples/basic/blinky_pwm -- -DCONFIG_REGULATOR_GPIO=n
west flash -d build/waveshare_rp2040_geek
LCD Backlight LED Fade by PWM
See also Zephyr sample: Fade LED.
west build -b waveshare_rp2040_geek/rp2040 -p -d build/waveshare_rp2040_geek zephyr/samples/basic/fade_led -- -DCONFIG_REGULATOR_GPIO=n
west flash -d build/waveshare_rp2040_geek
Hint
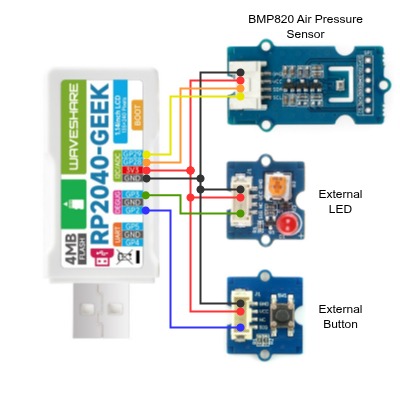
Even with the help of the dedicated Loopback wiring for tests shield, all necessary device tree changes are temporarily carried out to execute the standard examples. This assumes the external wiring as shown below (on the right).
External LED Blinky by GPIO
See also Zephyr sample: Blinky.
west build -b waveshare_rp2040_geek/rp2040 -p --shield "loopback_test" -d build/waveshare_rp2040_geek zephyr/samples/basic/blinky
west flash -d build/waveshare_rp2040_geek
External LED Blinky by PWM
See also Zephyr sample: PWM Blinky.
west build -b waveshare_rp2040_geek/rp2040 -p --shield "loopback_test" -d build/waveshare_rp2040_geek zephyr/samples/basic/blinky_pwm
west flash -d build/waveshare_rp2040_geek
External LED Fade by PWM
See also Zephyr sample: Fade LED.
west build -b waveshare_rp2040_geek/rp2040 -p --shield "loopback_test" -d build/waveshare_rp2040_geek zephyr/samples/basic/fade_led
west flash -d build/waveshare_rp2040_geek
External LED Switch ON/OFF by External Button
See also Zephyr sample: Button.
west build -b waveshare_rp2040_geek/rp2040 -p --shield "loopback_test" -d build/waveshare_rp2040_geek zephyr/samples/basic/button
west flash -d build/waveshare_rp2040_geek
Hello Shell with USB-CDC/ACM Console
Hello Shell
See also Bridle sample: Hello Shell.
west build -b waveshare_rp2040_geek/rp2040 -p -S "usb-console" --shield "loopback_test" -d build/waveshare_rp2040_geek bridle/samples/helloshell
west flash -d build/waveshare_rp2040_geek
Simple test execution on target
(text in bold is a command input)
uart:~$ hello -h
hello - say hello
uart:~$ hello
Hello from shell.
uart:~$ hwinfo devid
Length: 8
ID: 0x877b9fd26338399c

uart:~$ kernel version
Zephyr version 4.5.0

uart:~$ bridle version
Bridle version 4.4.99

uart:~$ bridle version long
Bridle version 4.4.99.0

uart:~$ bridle info
Zephyr: 4.5.0
Bridle: 4.4.99
uart:~$ device list
devices:
- clock-controller@40008000 (READY)
  DT node labels: clocks
- reset-controller@4000c000 (READY)
  DT node labels: reset
- snippet_cdc_acm_console_uart (READY)
  DT node labels: snippet_cdc_acm_console_uart
- timer@40054000 (READY)
  DT node labels: timer
- uart@40038000 (READY)
  DT node labels: uart1 rpidbg_serial grove_serial pico_serial rpipico_serial
- watchdog@40058000 (READY)
  DT node labels: wdt0
- dma@50000000 (READY)
  DT node labels: dma
- gpio-port@0 (READY)
  DT node labels: gpio0
- usbd@50110000 (READY)
  DT node labels: usbd zephyr_udc0
- adc@4004c000 (READY)
  DT node labels: adc rpigeek_adc
- flash-controller@18000000 (READY)
  DT node labels: ssi
- i2c@40044000 (READY)
  DT node labels: i2c0 zephyr_i2c stemma_i2c qwiic_i2c grove_i2c0 grove_i2c pico_i2c0 pico_i2c rpipico_i2c0 rpipico_i2c
- pwm@40050000 (READY)
  DT node labels: pwm rpigeek_pwm
- vreg@40064000 (READY)
  DT node labels: vreg
- rtc@4005c000 (READY)
  DT node labels: rtc
- lcd-backlight-en (READY)
  DT node labels: lcd_backlight_en
- rpigeek-dbg-pwm-leds (READY)
  DT node labels: pwm_leds
- dietemp (READY)
  DT node labels: die_temp
uart:~$ history
[  0] history
[  1] device list
[  2] bridle info
[  3] bridle version long
[  4] bridle version
[  5] kernel version
[  6] hwinfo devid
[  7] hello
[  8] hello -h
Operate with the on-chip voltage regulator unit:
uart:~$ regulator vlist vreg
0.800000 V
0.850000 V
0.900000 V
0.950000 V
1.000000 V
1.050000 V
1.100000 V
1.150000 V
1.200000 V
1.250000 V
1.300000 V
uart:~$ regulator vget vreg
1.100000 V
Trigger a power-off/on sequence:
uart:~$ hwinfo reset_cause
reset caused by:
- power-on reset

uart:~$ regulator disable vreg
*** Booting Zephyr OS build v4.5.0…***
Hello World! I'm THE SHELL from waveshare_rp2040_geek
uart:~$ hwinfo reset_cause
reset caused by:
- power-on reset
Operate with the on-board LCD backlight switch as voltage regulator:
uart:~$ regulator vlist lcd-backlight-en
3.300000 V
0 uV
uart:~$ regulator vget lcd-backlight-en
3.300000 V
The off/on sequence:
uart:~$ regulator vset lcd-backlight-en 0V
uart:~$ regulator vset lcd-backlight-en 3300mV
Note
PWM LED conflicts with GPIO!
Operations with the external LED in PWM mode will fail when ever the corresponding GPIO line 3 was configured as digital output. This condition is irreversible at runtime within the shell and requires a system reset.
Operate with the external LED DBG:3:PWM_LED at GP3 / PWM3 (PWM1CHB):
uart:~$ led on rpigeek-dbg-pwm-leds 0
rpigeek-dbg-pwm-leds: turning on LED 0
uart:~$ led set_brightness rpigeek-dbg-pwm-leds 0 10
rpigeek-dbg-pwm-leds: setting LED 0 brightness to 10
uart:~$ led set_brightness rpigeek-dbg-pwm-leds 0 50
rpigeek-dbg-pwm-leds: setting LED 0 brightness to 50
uart:~$ led set_brightness rpigeek-dbg-pwm-leds 0 100
rpigeek-dbg-pwm-leds: setting LED 0 brightness to 100
uart:~$ led off rpigeek-dbg-pwm-leds 0
rpigeek-dbg-pwm-leds: turning off LED 0
uart:~$ led blink rpigeek-dbg-pwm-leds 0 50 50
rpigeek-dbg-pwm-leds: blinking LED 0 with 50 ms on and 50 ms off
uart:~$ led off rpigeek-dbg-pwm-leds 0
rpigeek-dbg-pwm-leds: turning off LED 0
Note
PWM conflicts with GPIO!
Operations with the external LED in PWM mode will fail when ever the corresponding GPIO line 3 was configured as digital output. This condition is irreversible at runtime within the shell and requires a system reset.
Operate with the external LED DBG:3:PWM_LED at GP3 / PWM3 (PWM1CHB):
uart:~$ pwm usec rpigeek_pwm 3 20000 20000
uart:~$ pwm usec rpigeek_pwm 3 20000 19000
uart:~$ pwm usec rpigeek_pwm 3 20000 18000
uart:~$ pwm usec rpigeek_pwm 3 20000 17000
uart:~$ pwm usec rpigeek_pwm 3 20000 16000
uart:~$ pwm usec rpigeek_pwm 3 20000 15000
uart:~$ pwm usec rpigeek_pwm 3 20000 10000
uart:~$ pwm usec rpigeek_pwm 3 20000 5000
uart:~$ pwm usec rpigeek_pwm 3 20000 2500
uart:~$ pwm usec rpigeek_pwm 3 20000 500
uart:~$ pwm usec rpigeek_pwm 3 20000 0
Operate with the external LED DBG:3:PWM_LED at GP3 as GPIO:
Operate with the external LED:
uart:~$ gpio get gpio0 GP3_SCL0
0

uart:~$ gpio conf gpio0 GP3_SCL0 oh0

uart:~$ gpio set gpio0 GP3_SCL0 1
uart:~$ gpio set gpio0 GP3_SCL0 0

uart:~$ gpio blink gpio0 GP3_SCL0
Hit any key to exit
Operate with the on-board LCD backlight switch LCD_BL at GP25 as GPIO:
uart:~$ gpio get gpio0 LCD_BL_PWM9
0

uart:~$ gpio conf gpio0 LCD_BL_PWM9 oh0

uart:~$ gpio set gpio0 LCD_BL_PWM9 1
uart:~$ gpio set gpio0 LCD_BL_PWM9 0

uart:~$ gpio blink gpio0 LCD_BL_PWM9
Hit any key to exit
Get an overview of aviliable signale names:
uart:~$ gpio info gpio0
 ngpios: 30
 Reserved pin mask: 0xCD63E0C3

 Reserved  Pin  Line Name
     *      0
     *      1
            2    GP2_SDA0
            3    GP3_SCL0
            4    TX1
            5    RX1
     *      6
     *      7
            8    LCD_DC
            9    LCD_CSN1
           10    LCD_SCK1
           11    LCD_SDO1
           12    LCD_RST
     *     13
     *     14
     *     15
     *     16
     *     17
           18    SDHC_SCK0
           19    SDHC_SDO0
           20    SDHC_SDI0
     *     21
     *     22
           23    SDHC_CSN0
     *     24
           25    LCD_BL_PWM9
     *     26
     *     27
           28    SDA0_ADC2
           29    SCL0_ADC3
Operate with the on-chip RTC unit:
uart:~$ rtc get rtc
RTC not set
uart:~$ rtc set rtc 2024-11-23T18:37:55

uart:~$ rtc get rtc
2024-11-23T18:37:59.000
Operate with the on-chip timer unit:
uart:~$ timer oneshot timer 0 1000000
timer: Alarm triggered
Erase, Write and Verify
uart:~$ flash read ssi 0xe0000 0x40
000E0000: ff ff ff ff ff ff ff ff  ff ff ff ff ff ff ff ff |........ ........|
000E0010: ff ff ff ff ff ff ff ff  ff ff ff ff ff ff ff ff |........ ........|
000E0020: ff ff ff ff ff ff ff ff  ff ff ff ff ff ff ff ff |........ ........|
000E0030: ff ff ff ff ff ff ff ff  ff ff ff ff ff ff ff ff |........ ........|

uart:~$ flash test ssi 0xe0000 0x1000 2
Erase OK.
Write OK.
Verified OK.
Erase OK.
Write OK.
Verified OK.
Erase-Write-Verify test done.
uart:~$ flash read ssi 0xe0000 0x40
000E0000: 00 01 02 03 04 05 06 07  08 09 0a 0b 0c 0d 0e 0f |........ ........|
000E0010: 10 11 12 13 14 15 16 17  18 19 1a 1b 1c 1d 1e 1f |........ ........|
000E0020: 20 21 22 23 24 25 26 27  28 29 2a 2b 2c 2d 2e 2f | !"#$%&' ()*+,-./|
000E0030: 30 31 32 33 34 35 36 37  38 39 3a 3b 3c 3d 3e 3f |01234567 89:;<=>?|

uart:~$ flash page_info 0xe0000
Page for address 0xe0000:
start offset: 0xe0000
size: 4096
index: 224
uart:~$ flash erase ssi 0xe0000 0x1000
Erase success.

uart:~$ flash read ssi 0xe0000 0x40
000E0000: ff ff ff ff ff ff ff ff  ff ff ff ff ff ff ff ff |........ ........|
000E0010: ff ff ff ff ff ff ff ff  ff ff ff ff ff ff ff ff |........ ........|
000E0020: ff ff ff ff ff ff ff ff  ff ff ff ff ff ff ff ff |........ ........|
000E0030: ff ff ff ff ff ff ff ff  ff ff ff ff ff ff ff ff |........ ........|
The RP2040-Matrix has no on-board I2C devices. For this example the Grove Temperature and Barometer Sensor – BMP280 [23] was connected.
uart:~$ i2c scan zephyr_i2c
     0  1  2  3  4  5  6  7  8  9  a  b  c  d  e  f
00:             -- -- -- -- -- -- -- -- -- -- -- --
10: -- -- -- -- -- -- -- -- -- -- -- -- -- -- -- --
20: -- -- -- -- -- -- -- -- -- -- -- -- -- -- -- --
30: -- -- -- -- -- -- -- -- -- -- -- -- -- -- -- --
40: -- -- -- -- -- -- -- -- -- -- -- -- -- -- -- --
50: -- -- -- -- -- -- -- -- -- -- -- -- -- -- -- --
60: -- -- -- -- -- -- -- -- -- -- -- -- -- -- -- --
70: -- -- -- -- -- -- -- 77
1 devices found on zephyr_i2c
The I2C address 0x77 is a Bosch BMP280 Air Pressure Sensor and their
Chip-ID can read from register 0xd0. The Chip-ID must be 0x58:
uart:~$ i2c read_byte zephyr_i2c 77 d0
Output: 0x58
uart:~$ sensor info
device name: dietemp, vendor: Raspberry Pi Foundation, model: pico-temp, friendly name: RP2040 chip temperature
on-chip temperature sensor
uart:~$ sensor get dietemp
channel type=12(die_temp) index=0 shift=6 num_samples=1 value=62222673008ns (42.688552)
More Samples
Display Test and Demonstration
The following samples work with the chosen display. That is:
chosen { zephyr,display = &lcd_panel; };lcd_panel: &st7789v_240x135 {};LCD Orientation and Bit Order Test
Draw some basic rectangles onto the display using the Display driver API. See also Zephyr sample: Display.
west build -b waveshare_rp2040_geek/rp2040 -p -S "usb-console" -d build/waveshare_rp2040_geek zephyr/samples/drivers/display
west flash -d build/waveshare_rp2040_geek

|
|---|
TOP LEFT, TOP RIGHT, BOTTOM RIGHT |
LVGL Basic Sample
Displays “Hello World!” in the center of the screen and a counter at the bottom which increments every second using the LVGL module on top of the Display driver API. See also Zephyr sample: LVGL basic sample.
west build -b waveshare_rp2040_geek/rp2040 -p -S "usb-console" -d build/waveshare_rp2040_geek zephyr/samples/subsys/display/lvgl
west flash -d build/waveshare_rp2040_geek
This sample comes with a Shell command line access to the LVGL backend on the console, here configured for a USB console:
Simple test execution on target
uart:~$ lvgl
lvgl - LVGL shell commands
Subcommands:
  stats   : Show LVGL statistics
  monkey  : LVGL monkey testing

uart:~$ lvgl stats
stats - Show LVGL statistics
Subcommands:
  memory  : Show LVGL memory statistics
            Usage: memory [-c]
                   -c  dump chunk information

uart:~$ lvgl stats memory
Heap at 0x20001520 contains 2047 units in 11 buckets

  bucket#    min units        total      largest      largest
             threshold       chunks      (units)      (bytes)
  -----------------------------------------------------------
        0            1            1            1            8
        1            2            3            3           24
       10         1024            1         1138         9104

9148 free bytes, 6716 allocated bytes, overhead = 516 bytes (3.2%)
uart:~$ device list
devices:
- clock-controller@40008000 (READY)
  DT node labels: clocks
- reset-controller@4000c000 (READY)
  DT node labels: reset
- snippet_cdc_acm_console_uart (READY)
  DT node labels: snippet_cdc_acm_console_uart
- timer@40054000 (READY)
  DT node labels: timer
- uart@40038000 (READY)
  DT node labels: uart1 rpidbg_serial grove_serial pico_serial rpipico_serial
- watchdog@40058000 (READY)
  DT node labels: wdt0
- dma@50000000 (READY)
  DT node labels: dma
- gpio-port@0 (READY)
  DT node labels: gpio0
- usbd@50110000 (READY)
  DT node labels: usbd zephyr_udc0
- pwm@40050000 (READY)
  DT node labels: pwm rpigeek_pwm
- vreg@40064000 (READY)
  DT node labels: vreg
- spi@40040000 (READY)
  DT node labels: spi1
- spi@4003c000 (READY)
  DT node labels: spi0
- lcd-backlight-en (READY)
  DT node labels: lcd_backlight_en
- mipi-dbi-spi1 (READY)
  DT node labels: mipi_dbi_spi1
- st7789v-240x135@0 (READY)
  DT node labels: st7789v_240x135 lcd_panel
TF/microSD Demonstration
The following samples work with the chosen SDHC interface in 1-bit mode and connected to SPI. That is:
&spi0 { sdhc0: sdhc@0 { compatible = "zephyr,sdhc-spi-slot"; }; };&sdhc0 { mmc { compatible = "zephyr,sdmmc-disk"; }; };File system manipulation
Using the File Systems API ontop of the Disk Access API with chosen TF/microSD. See also Zephyr sample: File system manipulation.
west build -b waveshare_rp2040_geek/rp2040 -p -S "usb-console" -d build/waveshare_rp2040_geek zephyr/samples/subsys/fs/fs_sample
west flash -d build/waveshare_rp2040_geek

The TF/microSD card should be pre-formatted with FAT FS. If there are any files or directories present in the card, the sample lists them out on the console, e.g.:
(optional) Boot Sector: MBR (Master Boot Record)
(optional) 1st Primary Partition: W95 FAT32 (LBA) (ID: 0x0C)
FAT File System: FAT (32-bit version)
Content:
img/RP2040-GEEK.bmp

Simple logging output on target
In case when no files could be listed, because there are none (empty FS),
directory some and file some.dat will be created and
list will run again to show them, e.g.:
(optional) Boot Sector: MBR (Master Boot Record)
(optional) 1st Primary Partition: W95 FAT32 (LBA) (ID: 0x0C)
FAT File System: FAT (32-bit version)
Content: NONE (empty FS)
Simple logging output on target
In there is no FS (or the FS is corrupted), the disk is attempted to re-format to FAT FS and list will run again to show them, e.g.:
Boot Sector: NONE (empty boot sector, no partition table) – (optional) MBR (Master Boot Record)
1st Primary Partition: NONE (empty partition table entry) – (optional) W95 FAT32 (LBA) (ID: 0x0C)
FAT File System: NONE (empty partition)
Content: NONE (empty FS)
Simple logging output on target
Warning
In case when mount fails the device may get re-formatted to FAT FS.
To disable this behaviour disable CONFIG_FS_FATFS_MOUNT_MKFS .
west build -b waveshare_rp2040_geek/rp2040 -p -S "usb-console" -d build/waveshare_rp2040_geek zephyr/samples/subsys/fs/fs_sample -- -DCONFIG_FS_FATFS_MOUNT_MKFS=n
west flash -d build/waveshare_rp2040_geek