Waveshare RP2350-CAN
The RP2350 SoC [44] by Raspberry Pi Ltd. is a small sized and low-cost 32-bit dual ARM Cortex-M33 and dual 32-bit Hazard3 RISC-V (RV32IMAC+) microcontroller and predestined for versatile board designs. The Waveshare RP2350 board series based on this microcontroller offers a wide range with different scaling factors, in size, features and interfaces for communication, input and output.
Board Overview
Hardware
The RP2350-CAN [21] is a pico sized CAN bus focused development board. The on-board USB-C connector makes it compatible to future standards. It comes with an on-board SPI/CAN controller, fully supports CAN V2.0B specification with communication rate up to 1 Mbps, together with an CAN transceiver and higher current high-efficiency DC-DC buck-boost converter. The castellated module allows soldering direct to carrier boards.
Features and Resources |
Printed Circuit Board |
5V/1.1A 3.3V/1.8A 3.3V(OUT) 3.3V(EN/PS) 150㎒ 4㎆ 520㎅ RST GREEN L/H USB-C CAN UF2 26 16 3 2 2 2
Design Data
|

|
Positions
|
|---|
|
Data Sheets
Flash partitions
QSPI NOR-Flash |
code_partition |
storage_partition |
|---|---|---|
primary 4㎆ |
1㎆ |
3㎆ |
secondary N/A |
– |
– |
Pinouts
The peripherals of the RP2350 SoC [44] can be routed to various pins on the board. The configuration of these routes can be modified through DTS. Please refer to the datasheet to see the possible routings for each peripheral. The default assignments for the board is defined below.
External pin mapping on the RP2350-CAN is identical to the original Raspberry Pi Pico board, but note that internal RP2350A GPIO lines 23 and 24 are routed to the voltage regulator and USB connector for SMPS (MP28164) power saving modes and USB VBUS sense. GPIO line 25 is routed to the on-board user LED and GPIO line 29 will be used for VSYS/2 voltage monitoring per default.
In addition, GPIO lines 8 to 12 are used for control and SPI communication with the on-board SPI/CAN controller, but are still available externally in parallel.
Pin Mapping |
Pinout |
Default Zephyr Peripheral Mapping
Devicetree compatible |
|
Supported Features
Similar to the Raspberry Pi Pico 2 the board configuration supports the following hardware features:
Peripheral |
Kconfig option |
Devicetree compatible |
Zephyr API |
|---|---|---|---|
PINCTRL |
|||
GPIO |
|||
UART |
|||
UDC (USB Device Controller) |
|||
I2C |
|||
SPI |
|||
PWM |
|||
ADC |
|||
Temperature (Sensor) |
|||
Timer (Counter) |
|||
Watchdog Timer (WDT) |
|||
Flash |
|||
PIO |
N/A |
||
UART (PIO) |
|||
SPI (PIO) |
|||
WS2812 (PIO) |
|
N/A |
|
DMA |
|||
HWINFO |
N/A |
||
VREG |
|||
RESET |
|||
CLOCK |
|||
NVIC |
N/A |
Nested Vector Interrupts Controller |
|
SYSTICK |
N/A |
Other hardware features are not currently supported by Zephyr. The default configuration can be found in the different Kconfig files:
boards/waveshare/rp2350_can/waveshare_rp2350_can_rp2350a_hazard3_0_defconfig
boards/waveshare/rp2350_can/waveshare_rp2350_can_rp2350a_m33_0_defconfig
Board Configurations
The board can be configured for the following different use cases.
west build -b waveshare_rp2350_can/rp2350a/hazard3_0
Use the serial port UART0 on edge header as Zephyr console and for the shell. Running on Hazard3/RISC-V core. EXPERIMENTAL
west build -b waveshare_rp2350_can/rp2350a/hazard3_0 -S usb-console
Use the native USB device port with CDC-ACM as Zephyr console and for the shell. Running on Hazard3/RISC-V core. EXPERIMENTAL
west build -b waveshare_rp2350_can/rp2350a/m33_0
Use the serial port UART0 on edge header as Zephyr console and for the shell. Running on Cortex-M33 core.
west build -b waveshare_rp2350_can/rp2350a/m33_0 -S usb-console
Use the native USB device port with CDC-ACM as Zephyr console and for the shell. Running on Cortex-M33 core.
Connections and IOs
The Waveshare wiki [20] has detailed information about board connections. Download the different schematics or datasheets as linked above per board for more details. The pinout diagrams can also be found there.
System Clock
The RP2350A [44] MCU is configured to use the 12㎒ external crystal with the on-chip PLL generating the 150㎒ system clock. The internal AHB and APB units are set up in the same way as the upstream Raspberry Pi Pico C/C++ SDK [15] libraries.
GPIO (PWM) Ports
The RP2350A [44] MCU has 1 GPIO cell which covers all I/O pads and
8 PWM function unit each with 2 channels beside a dedicated Timer unit. The
channel PWM4 B is available on the on-board user LED. All channels of PWM0
until PWM7 are available on the Raspberry Pi Pico header.
ADC/TS Ports
The RP2350A [44] MCU has 1 ADC with 4 channels and an additional
fifth channel for the on-chip temperature sensor (TS). The ADC channels 0-2
are available on the Raspberry Pi Pico header. The ADC channel 3 will be
used for internal on-board voltage monitoring.
The external voltage reference ADC_VREF is directly connected to the 3.3V
power supply and is also available on the Raspberry Pi Pico header.
SPI Port
The RP2350A [44] MCU has 2 SPIs. To the edge connectors, SPI0 is
usable for external devices over GP19 (MOSI), GP16 (MISO), GP18 (SCK), and
GP17 (CSn) on the Raspberry Pi Pico header. SPI1 will be used for internal
on-board CAN controller over GP11 (MOSI), GP12 (MISO), GP10 (SCK), and GP9 (CSn).
I2C Port
The RP2350A [44] MCU has 2 I2Cs. The default serial bus I2C0 and
the alternative I2C1 are usable for external devices over GP4 (I2C0_SDA),
GP5 (I2C0_SCL), GP14 (I2C1_SDA), and GP15 (I2C1_SCL) on the Raspberry Pi Pico
header.
Serial Port
The RP2350A [44] MCU has 2 UARTs. One of the UARTs (UART0) is
connected to external devices over GP0 (TX) and GP1 (RX) on the Raspberry Pi Pico header, optional with full featured EIA 232D handshake signals, and
is the Zephyr console. UART1 is not available in any default setup.
USB Device Port
The RP2350A [44] MCU has a (native) USB device port that can be used to communicate with a host PC. See the USB sample applications for more, such as the USB CDC ACM UART sample sample which sets up a virtual serial port that echos characters back to the host PC. As an alternative to the default Zephyr console on serial port the Bridle USB Console Snippet (usb-console) can be used to enable CDC ACM and switch the console to USB
USB device idVendor=2e8a, idProduct=000a, bcdDevice= 4.05
USB device strings: Mfr=1, Product=2, SerialNumber=3
Product: RP2350-CAN (CDC ACM)
Manufacturer: Waveshare (Raspberry Pi)
SerialNumber: B46993A480CF94B1
To integrate specific USB device functions that do not follow a USB standard class, the following alternate identifier numbers are available for the various Waveshare RP2040 and RP2350 boards according to the Raspberry Pi USB product ID list [13]:
RP2040
0x101F:0x1020:0x1021:0x1039:RP2040-LCD-1.28
0x103A:0x1044:Power Management HAT (B)
0x1055:0x1056:0x1057:RP2040-Touch-LCD-1.28
0x1083:RP2040-PiZero
0x1084:0x1085:0x1086:RP2040-BLE
0x1087:PICO-Cam-A
RP2350
0x10B0:RP2350-Zero
0x10B1:RP2350-Plus
0x10B2:RP2350-Tiny
0x10B3:RP2350-LCD-1.28
0x10B4:RP2350-Touch-LCD-1.28
0x10B5:RP2350-One
0x10B6:RP2350-Geek
0x10B7:RP2350-LCD-0.96
0x10C3:RP2350-ETH
Programmable I/O (PIO)
The RP2350 SoC [44] comes with three PIO periherals. These are three simple co-processors that are designed for I/O operations. The PIOs run a custom instruction set, generated from a custom assembly language. PIO programs are assembled using pioasm, a tool provided by Raspberry Pi. Further information can be found in the Raspberry Pi Pico C/C++ SDK [15] document, section with title “Using PIOASM, the PIO Assembler”.
Zephyr does not (currently) assemble PIO programs. Rather, they should be manually assembled and embedded in source code. An example of how this is done can be found at drivers/serial/uart_rpi_pico_pio.c or drivers/spi/spi_rpi_pico_pio.c.
Programming and Debugging
Flashing
Using UF2
If you don’t have an SWD adapter, you can flash the board with a UF2 file.
By default, building an app for this board will generate a
build/zephyr/zephyr.uf2 file. If the board is powered on with
the BOOTSEL button pressed, it will appear on the host as a mass
storage device:
USB device idVendor=2e8a, idProduct=000f, bcdDevice= 1.00
USB device strings: Mfr=1, Product=2, SerialNumber=0
Product: RP2350 Boot
Manufacturer: Raspberry Pi
SerialNumber: A0231978E046
The UF2 file should be drag-and-dropped or copied on command line to the device, which will then flash the board.
RP2350 Boot-ROM
Each RP2350 SoC [44] ships the UF2 compatible [9] bootloader pico-bootrom-rp2350 [16], a native support in silicon. The full source for the RP2350 bootrom at pico-bootrom-rp2350 [16] includes versions A2, A3 and A4 of the bootrom, which correspond to the same silicon revisions, respectively.
Note that every time you build a program for the RP2350, the Pico SDK selects and creates an appropriate image definition and/or partition table block with attributes and precedes it in the firmware. Further information can be found in the RP2350 Datasheet [45], sections with title “Bootrom” and “Processor Controlled Boot Sequence”.
Using SEGGER JLink
You can flash the board with a SEGGER JLink debug probe as described in Building, Flashing and Debugging.
Here is an example of building and flashing the Blinky application.
west build -b waveshare_rp2350_can/rp2350a/m33_0 -p -d build/waveshare_rp2350_can zephyr/samples/basic/blinky
west flash -r jlink -d build/waveshare_rp2350_can
Using OpenOCD
To use PicoProbe [17] or Raspberry Pi Debug Probe [18], you must configure
udev. Create a file in /etc/udev.rules.d with any name,
and write the line below:
ATTRS{idVendor}=="2e8a", ATTRS{idProduct}=="0004", MODE="660", GROUP="plugdev", TAG+="uaccess"
ATTRS{idVendor}=="2e8a", ATTRS{idProduct}=="000c", MODE="660", GROUP="plugdev", TAG+="uaccess"
This example is valid for the case that the user joins to plugdev
groups.
The board has an SWD interface that can be used to program and debug the on-board RP2350. This interface can be utilized by OpenOCD. To use it with the RP2350, OpenOCD version 0.12.0 or later is needed. If you are using a Debian based system (including RaspberryPi OS, Ubuntu, and more), using the pico_setup.sh [19] script is a convenient way to set up the forked version of OpenOCD. Depending on the interface used (such as JLink), you might need to checkout to a branch that supports this interface, before proceeding. Build and install OpenOCD as described in the README.
Here is an example of building and flashing the Blinky application.
west build -b waveshare_rp2350_can/rp2350a/m33_0 -p -d build/waveshare_rp2350_can zephyr/samples/basic/blinky -- \
-DOPENOCD=/usr/local/bin/openocd \
-DOPENOCD_DEFAULT_PATH=/usr/local/share/openocd/scripts \
-DWAVESHARE_RP2350_DEBUG_ADAPTER=picoprobe
west flash -r openocd -d build/waveshare_rp2350_can
Set the environment variables OPENOCD to
/usr/local/bin/openocd and OPENOCD_DEFAULT_PATH to
/usr/local/share/openocd/scripts. This should work with the OpenOCD
that was installed with the default configuration. This configuration also
works with an environment that is set up by the pico_setup.sh [19] script.
WAVESHARE_RP2350_DEBUG_ADAPTER specifies what debug adapter is
used for debugging. If WAVESHARE_RP2350_DEBUG_ADAPTER was not
assigned, cmsis-dap is used by default. The other supported adapters
are picoprobe, raspberrypi-swd, jlink and
blackmagicprobe. How to connect picoprobe and
raspberrypi-swd is described in Getting Started Guide with Raspberry
Pi Pico [14]. Any other SWD debug adapter maybe also work with this configuration.
The value of WAVESHARE_RP2350_DEBUG_ADAPTER is cached, so it can
be omitted from west flash and west debug if it was
previously set while running west build.
WAVESHARE_RP2350_DEBUG_ADAPTER is used in an argument to OpenOCD as
"source [find interface/${WAVESHARE_RP2350_DEBUG_ADAPTER}.cfg]". Thus,
WAVESHARE_RP2350_DEBUG_ADAPTER needs to be assigned the file name of
the debug adapter.
You can also flash the board with the following command that directly calls OpenOCD (assuming a SEGGER JLink adapter is used):
$ openocd -f interface/jlink.cfg    \
          -c 'transport select swd' \
          -f target/rp2350.cfg      \
          -c "adapter speed 2000"   \
          -c 'targets rp2350.core0' \
          -c 'program path/to/zephyr.elf verify reset exit'
Debugging
The SWD interface can also be used to debug the board. To achieve this, you can either use SEGGER JLink or OpenOCD.
Using SEGGER JLink
Use a SEGGER JLink debug probe and follow the instruction in Building, Flashing and Debugging.
Using OpenOCD
Install OpenOCD as described for flashing the board.
Here is an example for debugging the Blinky application.
west build -b waveshare_rp2350_can/rp2350a/m33_0 -p -d build/waveshare_rp2350_can zephyr/samples/basic/blinky -- \
-DOPENOCD=/usr/local/bin/openocd \
-DOPENOCD_DEFAULT_PATH=/usr/local/share/openocd/scripts \
-DWAVESHARE_RP2350_DEBUG_ADAPTER=raspberrypi-swd
west debug -d build/waveshare_rp2350_can
As with flashing, you can specify the debug adapter by specifying WAVESHARE_RP2350_DEBUG_ADAPTER at west build time. No needs to specify it at west debug time.
You can also debug with OpenOCD and gdb launching from command-line. Run the following command:
$ openocd -f interface/jlink.cfg    \
          -c 'transport select swd' \
          -f target/rp2350.cfg      \
          -c "adapter speed 2000"   \
          -c 'targets rp2350.core0'
On another terminal, run:
$ gdb-multiarch
Inside gdb, run:
(gdb) tar ext :3333
(gdb) file path/to/zephyr.elf
You can then start debugging the board.
Basic Samples
LED Blinky and Fade
Green User LED Blinky by GPIO
See also Zephyr sample: Blinky.
On Hazard3 RISC-V (RV32IMAC+)
west build -b waveshare_rp2350_can/rp2350a/hazard3_0 -p -d build/waveshare_rp2350_can zephyr/samples/basic/blinky
west flash -d build/waveshare_rp2350_can
On ARM Cortex-M33
west build -b waveshare_rp2350_can/rp2350a/m33_0 -p -d build/waveshare_rp2350_can zephyr/samples/basic/blinky
west flash -d build/waveshare_rp2350_can
Green User LED Blinky by PWM
See also Zephyr sample: PWM Blinky.
On Hazard3 RISC-V (RV32IMAC+)
west build -b waveshare_rp2350_can/rp2350a/hazard3_0 -p -d build/waveshare_rp2350_can zephyr/samples/basic/blinky_pwm
west flash -d build/waveshare_rp2350_can
On ARM Cortex-M33
west build -b waveshare_rp2350_can/rp2350a/m33_0 -p -d build/waveshare_rp2350_can zephyr/samples/basic/blinky_pwm
west flash -d build/waveshare_rp2350_can
Green User LED Fade by PWM
See also Zephyr sample: Fade LED.
On Hazard3 RISC-V (RV32IMAC+)
west build -b waveshare_rp2350_can/rp2350a/hazard3_0 -p -d build/waveshare_rp2350_can zephyr/samples/basic/fade_led
west flash -d build/waveshare_rp2350_can
On ARM Cortex-M33
west build -b waveshare_rp2350_can/rp2350a/m33_0 -p -d build/waveshare_rp2350_can zephyr/samples/basic/fade_led
west flash -d build/waveshare_rp2350_can
Hello Shell with USB-CDC/ACM Console
Hello Shell
See also Bridle sample: Hello Shell.
On Hazard3 RISC-V (RV32IMAC+)
west build -b waveshare_rp2350_can/rp2350a/hazard3_0 -p -S "usb-console" -d build/waveshare_rp2350_can bridle/samples/helloshell
west flash -d build/waveshare_rp2350_can
On ARM Cortex-M33
west build -b waveshare_rp2350_can/rp2350a/m33_0 -p -S "usb-console" -d build/waveshare_rp2350_can bridle/samples/helloshell
west flash -d build/waveshare_rp2350_can
Simple test execution on target
(text in bold is a command input)
uart:~$ hello -h
hello - say hello
uart:~$ hello
Hello from shell.
uart:~$ hwinfo devid
Length: 8
ID: 0xb46993a480cf94b1

uart:~$ kernel version
Zephyr version 4.5.0

uart:~$ bridle version
Bridle version 4.4.99

uart:~$ bridle version long
Bridle version 4.4.99.0

uart:~$ bridle info
Zephyr: 4.5.0
Bridle: 4.4.99
On Hazard3 RISC-V (RV32IMAC+)
uart:~$ device list
devices:
- clock-controller@40010000 (READY)
  DT node labels: clocks
- reset-controller@40020000 (READY)
  DT node labels: reset
- interrupt-controller (READY)
  DT node labels: intc
- snippet_cdc_acm_console_uart (READY)
  DT node labels: snippet_cdc_acm_console_uart
- timer@400b8000 (READY)
  DT node labels: timer1
- timer@400b0000 (READY)
  DT node labels: timer0
- uart@40070000 (READY)
  DT node labels: uart0 pico_serial rpipico_serial
- watchdog@400d8000 (READY)
  DT node labels: wdt0
- dma@50000000 (READY)
  DT node labels: dma
- gpio-port@0 (READY)
  DT node labels: gpio0 gpio0_lo
- usbd@50110000 (READY)
  DT node labels: usbd zephyr_udc0
- adc@400a0000 (READY)
  DT node labels: adc
- flash-controller@400d0000 (READY)
  DT node labels: qmi
- i2c@40090000 (READY)
  DT node labels: i2c0 pico_i2c0 pico_i2c rpipico_i2c0 rpipico_i2c
- pwm@400a8000 (READY)
  DT node labels: pwm
- vreg@40100000 (READY)
  DT node labels: vreg
- spi@40088000 (READY)
  DT node labels: spi1 pico_spi1 rpipico_spi1
- spi@40080000 (READY)
  DT node labels: spi0 pico_spi0 pico_spi rpipico_spi0 rpipico_spi
- xl2515@0 (READY)
  DT node labels: xl2515 can0
- pwm-leds (READY)
  DT node labels: pwm_leds
- dietemp (READY)
  DT node labels: die_temp
On ARM Cortex-M33
uart:~$ device list
devices:
- clock-controller@40010000 (READY)
  DT node labels: clocks
- reset-controller@40020000 (READY)
  DT node labels: reset
- snippet_cdc_acm_console_uart (READY)
  DT node labels: snippet_cdc_acm_console_uart
- timer@400b8000 (READY)
  DT node labels: timer1
- timer@400b0000 (READY)
  DT node labels: timer0
- uart@40070000 (READY)
  DT node labels: uart0 pico_serial rpipico_serial
- watchdog@400d8000 (READY)
  DT node labels: wdt0
- dma@50000000 (READY)
  DT node labels: dma
- gpio-port@0 (READY)
  DT node labels: gpio0 gpio0_lo
- usbd@50110000 (READY)
  DT node labels: usbd zephyr_udc0
- adc@400a0000 (READY)
  DT node labels: adc
- flash-controller@400d0000 (READY)
  DT node labels: qmi
- i2c@40090000 (READY)
  DT node labels: i2c0 pico_i2c0 pico_i2c rpipico_i2c0 rpipico_i2c
- pwm@400a8000 (READY)
  DT node labels: pwm
- vreg@40100000 (READY)
  DT node labels: vreg
- spi@40088000 (READY)
  DT node labels: spi1 pico_spi1 rpipico_spi1
- spi@40080000 (READY)
  DT node labels: spi0 pico_spi0 pico_spi rpipico_spi0 rpipico_spi
- xl2515@0 (READY)
  DT node labels: xl2515 can0
- pwm-leds (READY)
  DT node labels: pwm_leds
- dietemp (READY)
  DT node labels: die_temp
uart:~$ history
[  0] history
[  1] device list
[  2] bridle info
[  3] bridle version long
[  4] bridle version
[  5] kernel version
[  6] hwinfo devid
[  7] hello
[  8] hello -h
Operate with the on-chip voltage regulator unit:
uart:~$ regulator vlist vreg
0.550000 V
0.600000 V
0.650000 V
0.700000 V
0.750000 V
0.800000 V
0.850000 V
0.900000 V
0.950000 V
1.000000 V
1.050000 V
1.100000 V
1.150000 V
1.200000 V
1.250000 V
1.300000 V
1.350000 V
1.400000 V
1.500000 V
1.600000 V
1.650000 V
1.700000 V
1.800000 V
1.900000 V
2.000000 V
2.350000 V
2.500000 V
2.650000 V
2.800000 V
3.000000 V
3.150000 V
3.300000 V
uart:~$ regulator vget vreg
1.100000 V
Note
PWM LED conflicts with GPIO!
Operations with the green user LED in PWM mode will fail when ever the corresponding GPIO line 25 was configured as digital output. This condition is irreversible at runtime within the shell and requires a system reset.
Operate with the green user LED PWM_LED at GP25 / PWM9 (PWM4CHB):
uart:~$ led on pwm-leds 0
pwm-leds: turning on LED 0
uart:~$ led set_brightness pwm-leds 0 10
pwm-leds: setting LED 0 brightness to 10
uart:~$ led set_brightness pwm-leds 0 50
pwm-leds: setting LED 0 brightness to 50
uart:~$ led set_brightness pwm-leds 0 100
pwm-leds: setting LED 0 brightness to 100
uart:~$ led off pwm-leds 0
pwm-leds: turning off LED 0
uart:~$ led blink pwm-leds 0 50 50
pwm-leds: blinking LED 0 with 50 ms on and 50 ms off
uart:~$ led off pwm-leds 0
pwm-leds: turning off LED 0
Note
PWM conflicts with GPIO!
Operations with the green user LED in PWM mode will fail when ever the corresponding GPIO line 25 was configured as digital output. This condition is irreversible at runtime within the shell and requires a system reset.
Operate with the green user LED PWM_LED at GP25 / PWM9 (PWM4CHB):
uart:~$ pwm usec pwm 9 20000 20000
uart:~$ pwm usec pwm 9 20000 19000
uart:~$ pwm usec pwm 9 20000 18000
uart:~$ pwm usec pwm 9 20000 17000
uart:~$ pwm usec pwm 9 20000 16000
uart:~$ pwm usec pwm 9 20000 15000
uart:~$ pwm usec pwm 9 20000 10000
uart:~$ pwm usec pwm 9 20000 5000
uart:~$ pwm usec pwm 9 20000 2500
uart:~$ pwm usec pwm 9 20000 500
uart:~$ pwm usec pwm 9 20000 0
Operate with the green user LED LED at GP25:
uart:~$ gpio get gpio0 ULED0_PWM9
0

uart:~$ gpio conf gpio0 ULED0_PWM9 oh0

uart:~$ gpio set gpio0 ULED0_PWM9 1
uart:~$ gpio set gpio0 ULED0_PWM9 0

uart:~$ gpio blink gpio0 ULED0_PWM9
Hit any key to exit
Get an overview of aviliable signale names:
uart:~$ gpio info gpio0
 ngpios: 30
 Reserved pin mask: 0x00000000

 Reserved  Pin  Line Name
            0    TX0
            1    RX0
            2    GP2_CTS0
            3    GP3_RTS0
            4    SDA0
            5    SCL0
            6    GP6
            7    GP7
            8    CAN_IRQ
            9    CAN_CSN1
           10    CAN_SCK1
           11    CAN_SDO1
           12    CAN_SDI1
           13    GP13
           14    GP14_SDA1
           15    GP15_SCL1
           16    SDI0
           17    CSN0
           18    SCK0
           19    SDO0
           20    GP20_PWM4
           21    GP21_PWM5
           22    GP22_PWM6
           23    PSU_SMPS
           24    PSU_VBUS/1.51
           25    ULED0_PWM9
           26    ADC0
           27    ADC1
           28    ADC2
           29    PSU_ADC3_VSYS/2
Operate with the channels:
on-board voltage monitor on channel ADC_CH3
on-chip temperature sensor on channel ADC_CH4
uart:~$ adc adc@400a0000 resolution 12
uart:~$ adc adc@400a0000 print
adc@400a0000:
Gain: 1
Reference: INTERNAL
Acquisition Time: 0
Channel ID: 0
Differential: 0
Resolution: 12
uart:~$ adc adc@400a0000 read 3
read: 2809
uart:~$ adc adc@400a0000 read 4
read: 886
Operate with the tow on-chip timer units:
uart:~$ timer oneshot timer0 0 1000000
timer: Alarm triggered
uart:~$ timer oneshot timer1 0 1000000
timer: Alarm triggered
Erase, Write and Verify
uart:~$ flash read qmi 0xe0000 0x40
000E0000: ff ff ff ff ff ff ff ff  ff ff ff ff ff ff ff ff |........ ........|
000E0010: ff ff ff ff ff ff ff ff  ff ff ff ff ff ff ff ff |........ ........|
000E0020: ff ff ff ff ff ff ff ff  ff ff ff ff ff ff ff ff |........ ........|
000E0030: ff ff ff ff ff ff ff ff  ff ff ff ff ff ff ff ff |........ ........|

uart:~$ flash test qmi 0xe0000 0x1000 2
Erase OK.
Write OK.
Verified OK.
Erase OK.
Write OK.
Verified OK.
Erase-Write-Verify test done.
Details
uart:~$ flash read qmi 0xe0000 0x40
000E0000: 00 01 02 03 04 05 06 07  08 09 0a 0b 0c 0d 0e 0f |........ ........|
000E0010: 10 11 12 13 14 15 16 17  18 19 1a 1b 1c 1d 1e 1f |........ ........|
000E0020: 20 21 22 23 24 25 26 27  28 29 2a 2b 2c 2d 2e 2f | !"#$%&' ()*+,-./|
000E0030: 30 31 32 33 34 35 36 37  38 39 3a 3b 3c 3d 3e 3f |01234567 89:;<=>?|

uart:~$ flash page_info 0xe0000
Page for address 0xe0000:
start offset: 0xe0000
size: 4096
index: 224
Revert
uart:~$ flash erase qmi 0xe0000 0x1000
Erase success.

uart:~$ flash read qmi 0xe0000 0x40
000E0000: ff ff ff ff ff ff ff ff  ff ff ff ff ff ff ff ff |........ ........|
000E0010: ff ff ff ff ff ff ff ff  ff ff ff ff ff ff ff ff |........ ........|
000E0020: ff ff ff ff ff ff ff ff  ff ff ff ff ff ff ff ff |........ ........|
000E0030: ff ff ff ff ff ff ff ff  ff ff ff ff ff ff ff ff |........ ........|
The RP2350-CAN has no on-board I2C devices. For this example the Grove Temperature and Barometer Sensor – BMP280 [24] was connected on I2C0.
uart:~$ i2c scan pico_i2c
     0  1  2  3  4  5  6  7  8  9  a  b  c  d  e  f
00:             -- -- -- -- -- -- -- -- -- -- -- --
10: -- -- -- -- -- -- -- -- -- -- -- -- -- -- -- --
20: -- -- -- -- -- -- -- -- -- -- -- -- -- -- -- --
30: -- -- -- -- -- -- -- -- -- -- -- -- -- -- -- --
40: -- -- -- -- -- -- -- -- -- -- -- -- -- -- -- --
50: -- -- -- -- -- -- -- -- -- -- -- -- -- -- -- --
60: -- -- -- -- -- -- -- -- -- -- -- -- -- -- -- --
70: -- -- -- -- -- -- -- 77
1 devices found on pico_i2c
The I2C address 0x77 is a Bosch BMP280 Air Pressure Sensor and their
Chip-ID can read from register 0xd0. The Chip-ID must be 0x58:
uart:~$ i2c read_byte pico_i2c 77 d0
Output: 0x58
uart:~$ sensor info
device name: dietemp, vendor: Raspberry Pi Foundation, model: pico-temp, friendly name: RP2350 chip temperature
on-chip temperature sensor
uart:~$ sensor get dietemp
channel type=12(die_temp) index=0 shift=5 num_samples=1 value=40109105735ns (21.189423)
Operate with the on-board CAN controller against another CAN node in normal (not loopback) mode:
uart:~$ can bitrate can0 1000000
setting bitrate to 1000000 bps

uart:~$ can filter add can0 123
adding filter with standard (11-bit) CAN ID 0x123, CAN ID mask 0x7ff
filter ID: 0

uart:~$ can filter add can0 -e 123
adding filter with extended (29-bit) CAN ID 0x00000123, CAN ID mask 0x1fffffff
filter ID: 1
uart:~$ can start can0
starting can0

uart:~$ can show can0
core clock:      8000000 Hz
max bitrate:     1000000 bps
max std filters: 5
max ext filters: 5
capabilities:    normal loopback listen-only
mode:            normal
state:           error-active
rx errors:       0
tx errors:       0
timing:          sjw 1..4, prop_seg 1..8, phase_seg1 1..8, phase_seg2 2..8, prescaler 1..64
transceiver:     passive/none
statistics:
  bit errors:    0
    bit0 errors: 0
    bit1 errors: 0
  stuff errors:  0
  crc errors:    0
  form errors:   0
  ack errors:    0
  rx overruns:   0
uart:~$ can send can0 010 45 67 89 ab cd ef 01 23
enqueuing CAN frame #0 with standard (11-bit) CAN ID 0x010, RTR 0, CAN FD 0, BRS 0, DLC 8

uart:~$ can send can0 -e 010 45 67 89 ab cd ef 01 23
enqueuing CAN frame #1 with extended (29-bit) CAN ID 0x00000010, RTR 0, CAN FD 0, BRS 0, DLC 8
More Samples
CANnectivity USB to CAN application firmware
CANnectivity
See also how to Workspace Setup the CANnectivity USB to CAN application firmware. The USB Device Firmware Upgrade (DFU) via the MCUboot [5] bootloader is not and will never be supported. The UF2 bootloader is perfect for firmware updates.
On Hazard3 RISC-V (RV32IMAC+)
west build -b waveshare_rp2350_can/rp2350a/hazard3_0 -p -d build/waveshare_rp2350_can cannectivity/app
west flash -d build/waveshare_rp2350_can
On ARM Cortex-M33
west build -b waveshare_rp2350_can/rp2350a/m33_0 -p -d build/waveshare_rp2350_can cannectivity/app
west flash -d build/waveshare_rp2350_can
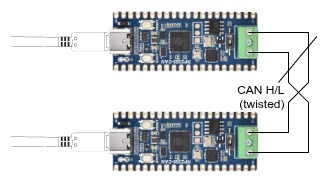
To verify the CANnectivity application is running, plug in two devices to your Linux development host, check the Linux kernel messages and use the can-utils [3] for testing.
Simple test execution on Linux host
(text in bold is a command input)
Assuming the CANnectivity udev rule [2] installed the dmesg output is as follow:
$ dmesg -w
usb 1-6.3: new full-speed USB device number 57 using xhci_hcd
usb 1-6.3: New USB device found, idVendor=1209, idProduct=ca01, bcdDevice= 1.06
usb 1-6.3: New USB device strings: Mfr=1, Product=2, SerialNumber=3
usb 1-6.3: Product: CANnectivity USB to CAN adapter
usb 1-6.3: Manufacturer: CANnectivity
usb 1-6.3: SerialNumber: B46993A480CF94B1
gs_usb 1-6.3:1.0: Configuring for 1 interfaces

usb 1-6.4: new full-speed USB device number 58 using xhci_hcd
usb 1-6.4: New USB device found, idVendor=1209, idProduct=ca01, bcdDevice= 1.06
usb 1-6.4: New USB device strings: Mfr=1, Product=2, SerialNumber=3
usb 1-6.4: Product: CANnectivity USB to CAN adapter
usb 1-6.4: Manufacturer: CANnectivity
usb 1-6.4: SerialNumber: BC6E3797335B08DC
gs_usb 1-6.4:1.0: Configuring for 1 interfaces
Set CAN 2.0 (nominal) bitrate of 1Mbps, increases the datagram transmission queue and change link state to up for both interfaces:
$ sudo ip link set dev can0 type can bitrate 1000000
$ sudo ip link set dev can0 txqueuelen 1000
$ sudo ip link set dev can0 up

$ sudo ip link set dev can1 type can bitrate 1000000
$ sudo ip link set dev can1 txqueuelen 1000
$ sudo ip link set dev can1 up
random noisy data generation on
can0andcan1with the cangen toolmonitor incoming and outgoing frames on
can0with the candump tool
$ cangen can0 &
$ cangen can1 &

$ candump -edx can0
  can0  TX - -  71B   [4]  07 35 5C 7D
  can0  RX - -  1F5   [8]  3B 41 D1 7C CE 5A 71 2C
  can0  TX - -  182   [8]  CF B0 36 63 93 63 2C 01
  can0  RX - -  759   [5]  85 6C D2 6D EB
  can0  TX - -  4FC   [8]  0B 59 FD 0D 45 03 9C 68
  can0  RX - -  0F8   [0]
  can0  TX - -  143   [6]  12 67 FE 19 1C D4
  can0  RX - -  7CC   [3]  4F 26 77
  can0  TX - -  27F   [8]  82 B7 06 19 B7 E6 08 14
  can0  RX - -  705   [8]  E6 B5 6E 5E BE B3 0B 5D
  can0  TX - -  5C0   [1]  7C
  can0  RX - -  16B   [5]  4F 51 01 78 B3
  can0  TX - -  1AB   [0]
  can0  RX - -  31A   [7]  A4 73 32 55 93 7F 29
  can0  TX - -  6C1   [6]  77 5A C6 71 DC 25
  can0  RX - -  468   [4]  E1 BB 90 06
  can0  TX - -  53A   [8]  45 B4 00 3C BC DE 50 0E
  can0  RX - -  593   [8]  2C B9 F7 48 ED 6C F1 04
  can0  TX - -  759   [4]  50 42 7D 0F
  can0  RX - -  332   [1]  D8
  can0  TX - -  5B1   [8]  9B D7 74 73 F5 86 88 2A
  can0  RX - -  6F2   [6]  FE 9E 3A 32 BE 6E
… … …